My main machine is a 15-inch MacBook Pro, Late 2008 model with a stock 320GB, 5400rpm Hitachi hard drive. As is typical, the hard drive is running out of space and it takes forever to compile XCode projects. I added a 240GB SSD from OWC as a replacement for the SuperDrive so I’ve now got over a 1/2TB of storage on the old girl.
And now I have a new problem. The SSD is really snappy compared to the old drive, but I really don’t want to have to manage what goes where while taking advantage of both drives. One of those new-fangled FusionDrives for the new iMacs would be great, but I still want the portability of a MacBook.
What is a FusionDrive, Really?
As it turns out, FusionDrive is a marketing term, not a piece of special hardware. Apple added Core Storage to it’s bag of tricks which is their extension of LVM or logical volume management. LVM allows drive spanning and in the case of FusionDrive, they’ve apparently added some smarts so the most often used files are stored on the faster storage.
Kudos to Pioneers Who Have Gone Before Me
I found a blog post by Patrick Stein describing the process of creating a FusionDrive and running some tests to prove that it works as advertised. Since then, Tomasz Korwel , Cocoanetics and Thomas Einwaller all performed the operation on differing hardware so I’m adding my machine to the list.
What’s the Catch?
If either of the drives fails, you loose everything!
Also, creating a FusionDrive will destroy all existing data so make sure it’s backed up before proceeding.
I recommend a tool called Carbon Copy Cloner and a portable drive at least as big as the new FusionDrive. Get in the habit of backing up daily. You can configure CCC so that it automatically starts an incremental backup when you plug the portable drive in so it’s always an exact image of your drive. This is a good idea regardless of whether or not you use a FusionDrive.
If CCC is used, you can validate your backup by rebooting and holding down the Alt key when you hear the beep. The boot option menu will appear allowing you to boot from something other than your hard drive. Choose to boot from the backup and it should look exactly like your hard drive though there may be a performance hit because it’s external.
Steps to Create a FusionDrive
We have one mechanical, rotating hard drive we’ll affectionately call HDD and one super neato SSD drive we’ll call… wait for it… SSD.
Step One – Get Your Disk Labels
Make sure all the drives to be used as the FusionDrive are unmounted so reboot once again and hold down the Alt key when you hear the beep. This time, boot from the recovery partition on the HDD. When the Mac finishes booting into recovery, open Terminal from the Utilities menu and run:
mount (or use diskutil list for the same info)

This brings up a list of your existing drives. Look for the device names for HDD & SDD. They are probably disk0s2 and disk1s2 though they could be different on your machine if you have more drives.
Step Two – Create the Logical Volume Group
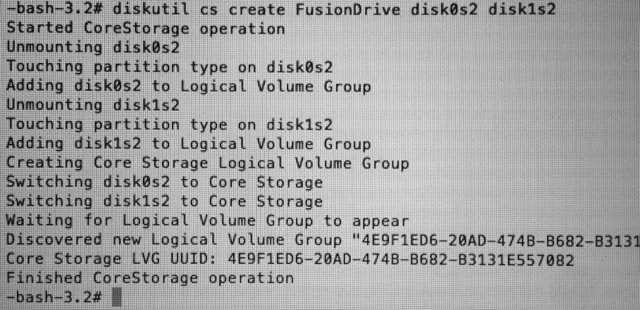
diskutil cs create FusionDrive disk0s2 disk1s2
You can use any name you want for the volume group, but I used FusionDrive. This is not the name you’ll see in the Finder.
You’ll see a progress indicator as this executes, but it happens rather quickly.

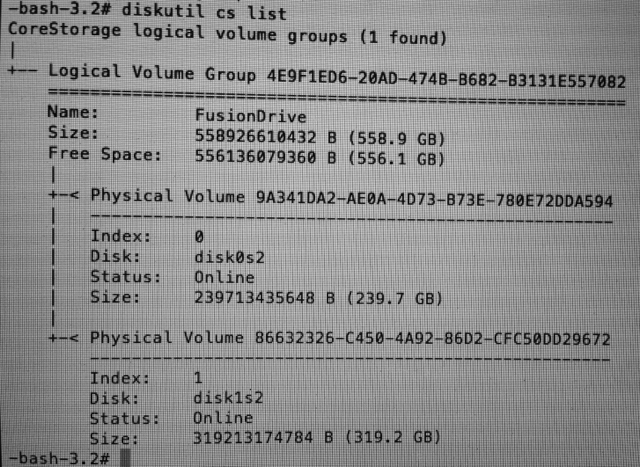
diskutil cs list

Step Three – Create a New Volume
Next we create the volume by using the GUID we got from creating the LVG and we want to use 100% of the available space. We can rename the drive from NewHD to something else in the Finder (eg: Macintosh HD) once we’re done. Format the drive with journaled HFS+.
diskutil cs createVolume 4E9F1ED6-20AD-4748-B682-B3131E557082 jhfs+ NewHD 100%
This is another quick operation.

Step Four – Restore Your Drive
So now you have a big, fat, empty FusionDrive that you need to load with OS X. If you’ve followed along, you can connect your backup drive and boot like before (holding the Alt key). This time, choose the backup drive to boot from. Now use CCC to clone your backup onto your FusionDrive. Go grab something to eat as this will take some time.
Once the restore operation is complete, reboot one final time with the Alt key and boot to the new FusionDrive. Mine wanted to go back to the recovery partition for some reason, but booting from the FusionDrive fixed that.
Once the machine finishes booting, open the Finder and rename the drive from NewHD to whatever you want.
Now, verify that CCC starts a backup when you connect the external drive and enjoy your new FusionDrive!


