See how to clone your existing Raspberry Pi SD Card to a USB boot drive!
SanDisk Extreme Pro Flash Drive: https://amzn.to/2JuVqb8

See how to clone your existing Raspberry Pi SD Card to a USB boot drive!
SanDisk Extreme Pro Flash Drive: https://amzn.to/2JuVqb8
I encountered a problem that took way too long to figure out so I put this together in hopes that it helps someone else. It’s a demo using the new Siri custom intents Apple added to iOS 12. It shows how to add UI from your app into Siri responses.
In a previous post, I played with the Haversine formula to calculate distances between two points (a user’s current location and a list of store locations for example). It got several hits presumably from Laravel (PHP framework) users trying to implement said formula in their projects. The part I left out was the actual implementation using Eloquent – essentially the post became clickbait thus ticking people off. I also eluded to a “better” formula, but never actually tried it so I decided to create a new post with updated information.
I do not possess the math skills to completely understand the nuances involved, but based on these two blog posts (original Haversine formula and the Vicinity great-circle distance formula), I understand the latter is more accurate when distances are closer together.
    protected function queryVicinity($lat, $lon)
    {
    	$radius = 100; // radius of bounding circle in kilometers
	//$EMR = 6371; // earth's mean radius, km
	$EMR = 3959; // earth's mean radius, miles

	// first-cut bounding box (in degrees)
	$maxLat = $lat + rad2deg($radius/$EMR);
	$minLat = $lat - rad2deg($radius/$EMR);
	// compensate for degrees longitude getting smaller with increasing latitude
	$maxLon = $lon + rad2deg($radius/$EMR/cos(deg2rad($lat)));
	$minLon = $lon - rad2deg($radius/$EMR/cos(deg2rad($lat)));

	$sql = '
		SELECT *, (ATAN2(SQRT(POWER(COS(RADIANS(lat)) * SIN(RADIANS(lon-:lon)), 2) +
		POWER(COS(RADIANS(:lat)) *SIN(RADIANS(lat)) -
		(SIN(RADIANS(:lat2)) * COS(RADIANS(lat)) * COS(RADIANS(lon-:lon2))), 2)),
		SIN(RADIANS(:lat3)) * SIN(RADIANS(lat)) +
		COS(RADIANS(:lat4)) * COS(RADIANS(lat)) * COS(RADIANS(lon-:lon3))) * :EMR) AS distance
	      	FROM (
	        	SELECT * FROM items WHERE lat BETWEEN :minLat
	        	AND :maxLat AND lon BETWEEN :minLon AND :maxLon
	        	// any other filters you want to add
	      	) AS FirstFilter
	   	HAVING distance < :radius
           	ORDER BY distance
		LIMIT 0, 20';

	$params = [
		'lon' => $lon,
	    	'lat' => $lat,
	    	'lat2' => $lat,// Repeated values not allowed so increment them in the params array
	    	'lon2' => $lon,
	    	'lat3' => $lat,
	    	'lat4' => $lat,
	    	'lon3' => $lon,
		'EMR' => $EMR,
		'minLat' => $minLat,
		'maxLat' => $maxLat,
		'minLon' => $minLon,
		'maxLon' => $maxLon,
		'radius' => $radius,
	];

	$results = DB::select(DB::raw($sql), $params);
	return Model::hydrate($results);
    }
I ran tests for several pages with both formulas on a table loaded with 1 million records. In all of my tests, the results were consistent. The “better” formula took significantly longer to run (0.76 vs 1.18 seconds) and this was similar no matter which page I used so I’m sticking with the old formula. Here’s the final function:
    protected function queryDistance($lat, $lon)
    {
    	$radius = 100; // radius of bounding circle in kilometers
	//$EMR = 6371; // earth's mean radius, km
	$EMR = 3959; // earth's mean radius, miles

	// first-cut bounding box (in degrees)
	$maxLat = $lat + rad2deg($radius/$EMR);
	$minLat = $lat - rad2deg($radius/$EMR);
	// compensate for degrees longitude getting smaller with increasing latitude
	$maxLon = $lon + rad2deg($radius/$EMR/cos(deg2rad($lat)));
	$minLon = $lon - rad2deg($radius/$EMR/cos(deg2rad($lat)));
	$d2rLat = deg2rad($lat);
	$d2rLon = deg2rad($lon);

	$sql = '
		SELECT *, (acos(sin(:d2rLat)*sin(radians(lat)) +
		cos(:d2rLat2)*cos(radians(lat))*cos(radians(lon)-:d2rLon)) *
		:EMR) AS distance
	      	FROM (
	        	SELECT * FROM items WHERE lat BETWEEN :minLat
	        	AND :maxLat AND lon BETWEEN :minLon AND :maxLon
	      	) AS FirstFilter
		HAVING distance < :radius
		ORDER BY distance
		LIMIT 0, 20';

	$params = [
		'd2rLat' => $d2rLat,
		'd2rLat2' => $d2rLat,
		'd2rLon' => $d2rLon,
		'EMR' => $EMR,
		'minLat' => $minLat,
		'maxLat' => $maxLat,
		'minLon' => $minLon,
		'maxLon' => $maxLon,
		'radius' => $radius,
	];

	$results = DB::select(DB::raw($sql), $params);
	return Model::hydrate($results);
    }
I hope this helps.
PHP is the internet language I’m most familiar and I’m using it to write an API back-end as a side-project (read that as doing this for fun).
Laravel is a great PHP framework not only for quickly creating front end websites, but also has some nice features for the back end as well. I’ve explored a few other frameworks over the past few months while I sharpened my PHP skills and settled on this stack for it’s completeness, ease of use and support. The documentation is good and there are plenty of helpful results from internet searches. They even have podcasts!
The API needed a route that performs a MySQL Spatial Query to retrieve database records close to a location and return the results as a JSON object. A query of this type is typically used as a store locator – tell me where you are and I’ll show you stores nearby. Getting the query working without special add-on libraries was one goal plus I was curious about performance of various query methods and it took me a while to put all of the pieces together, hence the post.
I found what is typically referred to as the Haversine formula though I’m told it’s really the spherical law of cosines. I’ll just call it math stuff.
The nested MySQL SQL statement for this is something like:
[snippet id=”39″]
Piece of cake, right? And here’s the PDO query:
[snippet id=”40″]
Total Execution Time: 17.015 milliseconds.
This returns a PHP stdClass array of database records.
Brilliant! I found a better formula while working on this so I’ll change it after some sleep, but I’ll proceed with the example using this one. Also, I used Faker to seed the database with 50,000 records to test performance on a large number of rows. Those of you with millions of rows, please stop snickering.
This example has a lot of code to deal with. I’ve never used stored procedures before, wanted to learn how and anticipated a performance increase by using one so lets find out.
Following some searches and a little trial and error, I ended up with
[snippet id=”41″]
It’s not all that different from the standard SQL query above, but it allowed me to replace that massive SQL statement in my code with:
[snippet id=”42″]
Total Execution Time: 17.497 milliseconds.
This returns a PHP stdClass array of database records.
OK. Roughly the same performance for this case. The stored procedure type-hints the passed-in values (user’s current latitude and longitude) which avoids a SQL-injection attack where we used a prepared statement in the original example. The code looks a little neater plus this method helps with the next step.
Laravel includes an ORM package called Eloquent that simplifies standard database interactions. It’s still PDO under the hood, but instead of sprinkling this all over your code
[snippet id=”43″]
use:
[snippet id=”44″]
Those two blocks perform the exact same query. The Eloquent version is more… well… eloquent. Building typical queries is much nicer as you can just tag more modifiers onto the same line. RTFM. It’s pretty cool.
Building this nested query completely in Eloquent proved difficult partially ’cause I’m a n00b at this and it’s an interesting query. For this case, we use an Eloquent raw query. My solution is:
[snippet id="45"]
This returns a PHP stdClass array of database records. Same as above. So there's three ways to achieve the same result with similar performance. Pick the one you like.
In order to take full advantage of Eloquent’s capabilities, however, we need to convert the PHP stdClass array into a Collection of Eloquent Model objects. FOR LOOP! NO! There must be an easier way. There is!
There are five columns in this table that are foreign keys to other tables. The term is Database Normalization. Fetching all of those associated objects is necessary to generate a proper response from this particular route. Yes, joins are an option, but Eloquent handles this for us with the relationship embedded in the model object.
This little gem was hard to find.
[snippet id=”46″]
Total Execution Time: 16.328 milliseconds.
Awesome! That one line takes the PHP stdClass array of database records as an input and builds a collection of Item objects including the five joined objects and it is extremely fast.
The code is simplified and the data can be passed directly to Fractal which gives us our JSON object. PHP’s json_encode() also works, but Fractal offers more options via transformer classes for formatting the JSON returned from the API.
This example shows three ways of performing SQL queries and for this example, they all performed about the same. The difference is the amount of code required to accomplish the task. The Laravel coding style follows the single responsibility principle resulting in much smaller functions and hopefully fewer bugs. I hope you found this useful.
Update (May 3, 2017): New test & results.
Several years ago, I recorded individual WAV files of my voice saying “one” through “twelve”, “fifteen”, “thirty”, “forty-five”, “AM” and “PM” to create a talking clock. A cron job fires a script to play the time every fifteen minutes. It also plays a WAV file of Big Ben at the top of the hour. The trick is to use the same voice inflection on each part to make them sound natural when slammed together to announce the hour, minutes if needed and meridian (AM/PM).
I don’t travel often, but when I do, I miss the clock. OK, it was raining, I had the house to myself and it sounded like a fun weekend project. A talking clock app is fairly easy to pull off, but it has to run in the foreground with the idle timer disabled meaning plugged in to power. Apple’s Push Notification Service (APNs for short) can start a short background task so the app should be able to announce the time in the background!
The WAV files were converted to CAF for iOS using afconvert. File format (-f) caff, data format (-d) little-endian, 16-bit, 44.1k, 1-channel (-c).
afconvert -f caff -d LEI16@44100 -c 1 <input.wav> <output.caf>
The UI is little more than a UITextField using an NSDateFormatter to update every second though that could change based on my next trip out of town.

Fabulously simple UI
The main logic lives in a scheduler class that handles all of the details of when and what to play. TDD helped move development of the class along rather quickly. AVQueuePlayer plays the files together as AVPlayerItems.
On initialization, the scheduler determines the next quarter hour time to play.
[snippet id=”28″]
Save this as an NSDate property on the scheduler.
An NSTimer runs in the viewController firing every second to update the UITextField with the current time and to check the scheduler’s isTimeToAnnounce method. When the hour and minute match the current time, start playing the audio files.
To determine which files to play, some minor adjustments are needed.
[snippet id=”29″]
This completes the foreground part of the app. Some things on iOS behave quite strangely in the background! We all know that UI calls must run on the main thread, but so do NSBundle calls otherwise pathForResource returns nil. Also, while you can start an AVQueuePlayer, then background the app and have it continue to play, you can’t start one in the background. This StackOverflow thread would have saved me a few hours had I seen it sooner. So AVQueuePlayer is great for playing music or podcasts, but not so good for TClock©.
System Sound Services provides a C interface for playing short sounds and it works in the background. The best solution seems to be loading all the files first, then playing the first file and using completion callbacks to play the next file in the chain. There’s only two or three small files, so loading them all into memory isn’t a problem. The tricky part was assigning the proper callback for the hour based on the minute value. If minute is zero, no minute file plays.
[snippet id=”30″]
System Sound Services isn’t hard to work with though it is a little different than you may be use to. These are the main parts of the code for loading and playing the audio. The AudioToolbox header and framework need to be included.
[snippet id=”31″]
Each callback starts the next file in the chain and disposes of the finished sound. The last meridianCallback resets the object’s SystemSoundID (UInt32) properties.
I found a great article on Ray Wenderlich’s site that walks you through setting up your own APNs server and creating an app to receive push notifications. Starting from a point of having full access to an internet-connected Linux machine speeds this part up tremendously, otherwise, this would have been the most time-consuming piece.
The article provides a series of PHP scripts using the LAMP stack and excellent instructions on dealing with generating and manipulating the certificates.
An iOS background task will run for about thirty seconds from a remote push so the server initiates pushes at around fifteen seconds before it’s time to announce. This usually gives ample time for the push to go to Apple then down to the device. The happy-path delay is a second or two, but timing adjustments may be required.
To get the notification to run a background task, the key “content-available” = 1 needs to be part of the payload. Use the fetchCompletionHandler version of didReceiveRemoteNotification. Simply call completionHandler(UIBackgroundFetchResultNewData) after kicking off your background task. Read the article as it explains all of this in much greater detail.
The background task does the same thing the viewController does in the foreground and uses the device’s clock to determine when to speak the time. There are a few trips through [NSThread sleepForTimeInterval:1], but usually less than ten.
While I admit, this is somewhat of a Rube Goldberg machine, I’m sending my own push notifications! #thumbs_up_emoji
The back-end of the push process has been a black box to me for a while so it was fun to learn all of it end-to-end.
The thirty second limit is there to keep apps from running long, battery-intensive processes in the background. Keep an eye on [[UIApplication sharedApplication] backgroundTimeRemaining] from within your background task and jump out if it gets down below five seconds otherwise, the OS will kill it.
The ringer switch will silence the announcements. I suppose a UIButton would accomplish the same thing, but why mess with a flawless interface?
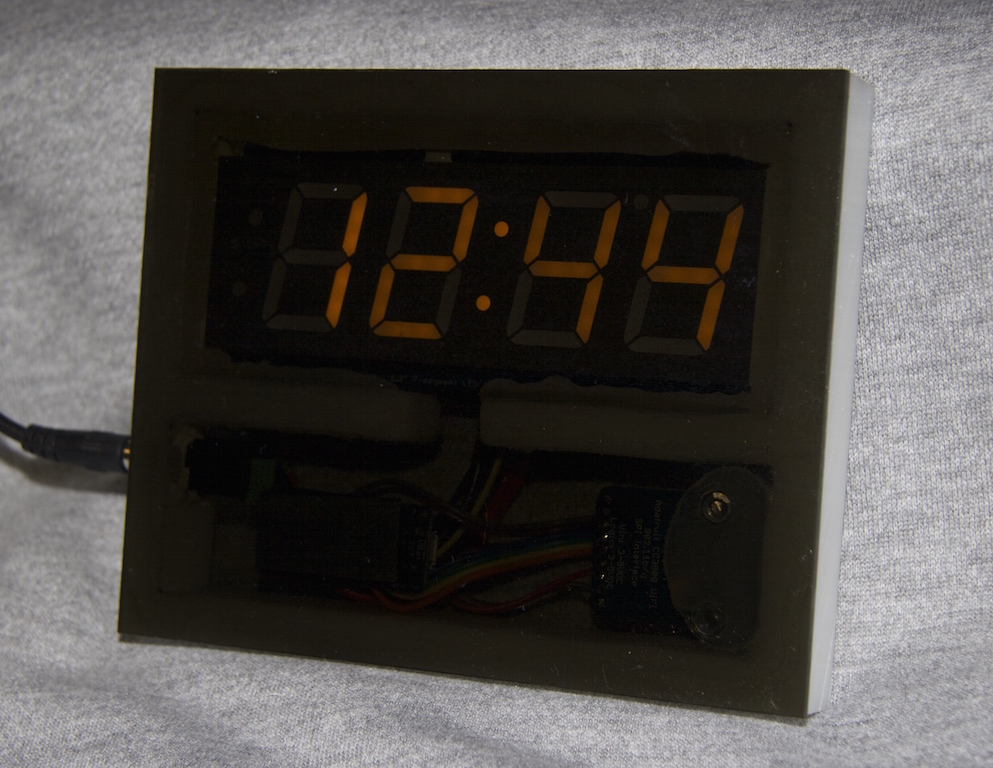
Finished Smart Clock.
While not a planned event, I typically end up working on some electronics project near the end of the year. This year, the stimulus was the end of daylight savings time. With twelve clocks in the house, it ticks me off that I have to manually reset each of them twice a year. Not really all that much, but enough this time to replace my old radio clock with the wrong daylight savings program – yea, it’s that old.
I have used various micro controllers in the past such as PICs, BASIC Stamps, Rabbit Semiconductor boards and Raspberry Pis, but the current model that would do the job is the Arduino Uno R3.
Arduino is an open-source electronics platform based on easy-to-use hardware and software. It’s intended for anyone making interactive projects.
The platform has a great, open-source programming interface and there are plenty of code samples and HowTos online.
The first hurdle to building a clock was the display. I needed a 4-digit, 7-segment display and I wanted it big. I’ve also never worked with one and figuring out the program for managing fourteen wires was not something I was looking forward to. Fortunately, I found the Adafruit 1.2″ 4-digit 7-segment display w/I2C backpack which is just frickin’ awesome! The backpack includes the driver chip necessary to multiplex the display and it only requires 4 wires to run it using an I-squared-C bus. Additionally, these displays are very bright!
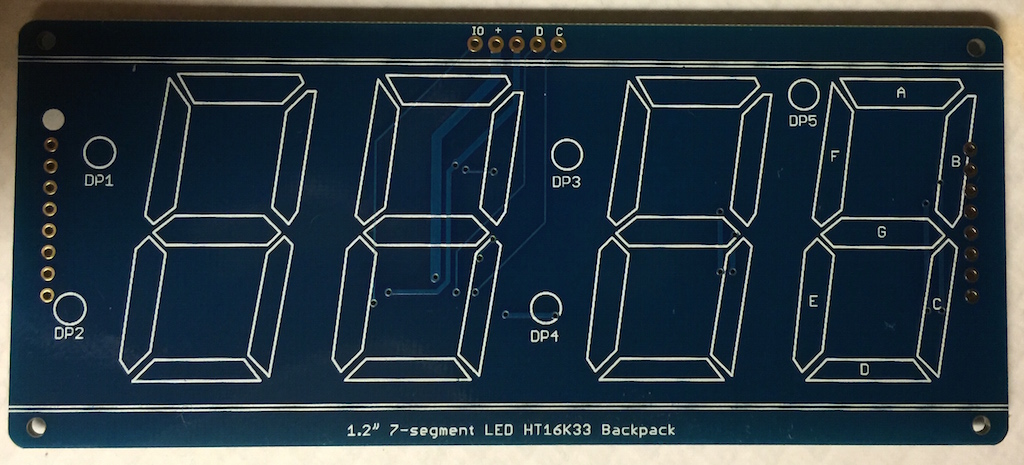
Adafruit 4-digit, 7-segment I2C backpack.
Display assembly was pretty simple. I matched up the pins on display with the printing on the backpack, soldered the pins, wired the backpack to the Arduino and wrote some code. It took about five minutes to attach the display to the backpack which included heating up the soldering iron. This backpack actually has five wires that connect to the Arduino, but two of them are +5V so I tied them together in final assembly.
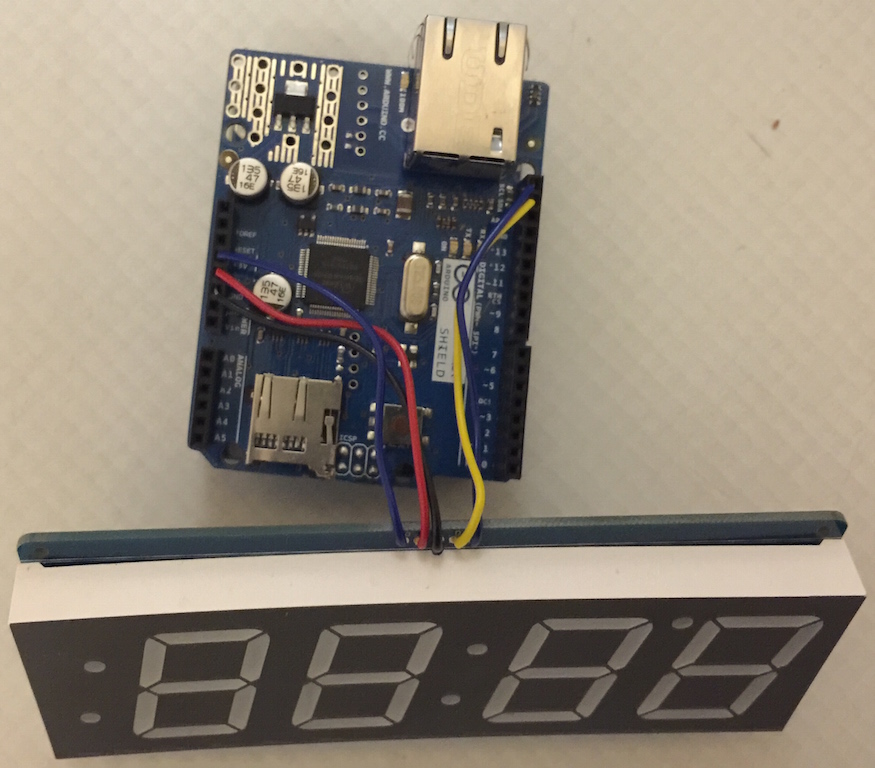
Arduino Uno w/Ethernet Shield and 7-segment display.
Adafruit provides an Arduino library for driving the display that includes code examples for sending numbers to the display which made that part very easy. One of the capabilities I noticed while looking at the library code was the ability to control the display’s brightness. I created a routine that sets the brightness based on the hour. I set it for maximum brightness at noon and minimum at midnight varying in between. This is a cool feature because you can see it easily during the day when the sun is bright, but it doesn’t keep you awake at night by lighting up the room. Run it at full brightness if you need a night light.
My Arduino board does not include native networking support so early prototypes of the project used an Ethernet Shield shown above that adds a wired ethernet connection. The Arduino development environment includes code samples for communicating with an NTP server to retrieve the current time. While very cool, NTP would not work for this because there is no automatic support for daylight savings. Additionally, connecting an ethernet cable to the clock was fine during prototyping, but I wanted WiFi for the finished product.

The breadboard stage includes WiFi and an Adafruit Trinket Pro.
Adafruit has a WiFi breakout module that can be used with virtually any micro controller. It requires eight wires including power and they have an Arduino library for the board. While support exists for choosing the WiFi settings remotely with a mobile phone, I took the short-cut and hard-coded the settings in the code.
At this point, I’ve converted the micro controller to an Adafruit Trinket Pro 5V, essentially a smaller version of the Uno (same chip) with a few missing features. Since the missing features aren’t needed for the finished product, it really is a nice solution.
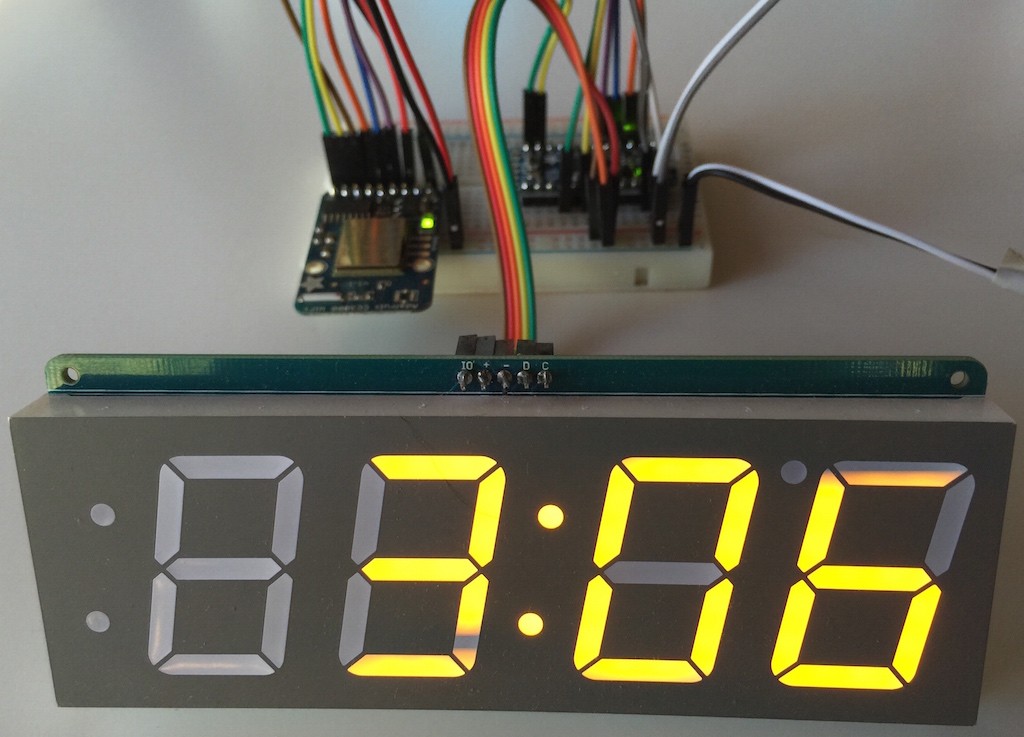
Working breadboard prototype.
I have a linux box running an Apache HTTP server with PHP. I created a page that returns the current local time in a string such as {{2014-12-11T11:06:41-0600}}.
I used the moustache template format in the return string which allows for a smaller receive buffer on the Arduino. When the web call returns, the content is parsed as it’s read. Buffering only the part between the moustaches is easy. This saves precious memory since the HTTP headers are part of the response and would be included in full-page buffering.
The Arduino checks the time at 1:01am, 2:01am and 3:01am every day to check if the RTC needs to be reset. When a daylight savings change occurs, the time will be off by an hour for one minute which is fine for my needs.

Finished project from the back showing components.
I looked into casting acrylic to make an enclosure, but that seemed to be way too difficult to get right and would have required more time than I wanted to spend. I ended up buying some scrap pieces from Austin Plastics & Supply. I found a piece of half-inch thick solid white acrylic to house the electronics and display plus a thin sheet of smoke tint for the front.
The most expensive part of this project was the ten-inch, eighty-tooth high density carbide blade for my table saw. It cut through that half-inch acrylic like butter and the cut was very clean with no finishing needed. Totally worth it! I cut the center out using a recently-acquired scroll saw. The cuts are not precise, but good enough to make everything fit. I used white silicone to hold the display in place (and prevent any stray light from shining through) and velcro to hold the Trinket, the RTC and the WiFi module.
While exploring the enclosure options, I ran the project in it’s breadboard state shown above for a couple of weeks. I noticed that the time was wrong on a couple of occasions, but it would correct itself within an hour when checking in with the linux server.
The Arduino has an internal clock, but it’s really just a millisecond register that eventually rolls over to zero. While not a problem for the internal timing needs of the Arduino, it’s not accurate enough for a clock. Adding an RTC (Real Time Clock) circuit to the project solved the problem and even allowed me to reduce the calls to the server to thrice daily versus once an hour. I attached the RTC module to the display’s backpack with velcro. It is the tiny board to the right of the wiring. The RTC’s backup battery is supposed to last five years. I’ll let you know.

Front view of the final assembly.
The only thing I’d change in the design is to make the case a little wider to allow better centering of the display. It isn’t that noticeable in the dark, but the numbers are noticeably off to the right a little during the day.
This was a fun project and I’m ready to toss the old radio clock out. The down side is that now I want to replace more clocks.
I work with NSURL from time to time and invariably need a chart to remind me what the class provides in the form of helpers. I tend to write something like the following to refresh my memory.
[snippet id=”27″]
Here’s a couple of handy charts to help you decide which property to use.
| NSURL Property | File Value |
|---|---|
| - (NSString *)absoluteString | file:///Users/you/Library/Application%20Support/iPhone%20Simulator /7.0.3/Applications/GUID/Library/Content/MobileHIG.pdf |
| - (NSURL *)absoluteURL | file:///Users/you/Library/Application%20Support/iPhone%20Simulator /7.0.3/Applications/GUID/Library/Content/MobileHIG.pdf |
| - (const char *) fileSystemRepresentation | /Users/you/Library/Application Support/iPhone Simulator /7.0.3/Applications/GUID/Library/Content/MobileHIG.pdf |
| - (NSString *)lastPathComponent | MobileHIG.pdf |
| - (NSString *)path | /Users/you/Library/Application Support/iPhone Simulator /7.0.3/Applications/GUID/Library/Content/MobileHIG.pdf |
| - (NSArray *)pathComponents | ( "/", Users, you, Library, "Application Support", "iPhone Simulator", "7.0.3", Applications, GUID, Library, Content, "MobileHIG.pdf" ) |
| - (NSString *)pathExtension | |
| - (NSString *)relativePath | /Users/you/Library/Application Support/iPhone Simulator /7.0.3/Applications/GUID/Library/Content/MobileHIG.pdf |
| - (NSString *)relativeString | file:///Users/you/Library/Application%20Support/iPhone%20Simulator /7.0.3/Applications/GUID/Library/Content/MobileHIG.pdf |
| - (NSString *)resourceSpecifier | /Users/you/Library/Application%20Support/iPhone%20Simulator /7.0.3/Applications/GUID/Library/Content/MobileHIG.pdf |
| - (NSString *)scheme | file |
| - (NSURL *)standardizedURL | file:///Users/you/Library/Application%20Support/iPhone%20Simulator /7.0.3/Applications/GUID/Library/Content/MobileHIG.pdf |
| NSURL Property | Internet Value |
|---|---|
| - (NSString *)absoluteString | http://blog.canispater.com:80/2013/11/nsurl-reference-chart/?pg=1&other=value |
| - (NSURL *)absoluteURL | http://blog.canispater.com:80/2013/11/nsurl-reference-chart/?pg=1&other=value |
| - (NSString *)host | blog.canispater.com |
| - (NSString *)lastPathComponent | nsurl-reference-chart |
| - (NSString *)path | /2013/11/nsurl-reference-chart |
| - (NSArray *)pathComponents | ( "/", 2013, 11, "nsurl-reference-chart" ) |
| - (NSNumber *)port | 80 |
| - (NSString *)query | pg=1&other=value |
| - (NSString *)relativePath | /2013/11/nsurl-reference-chart |
| - (NSString *)relativeString | http://blog.canispater.com:80/2013/11/nsurl-reference-chart/?pg=1&other=value |
| - (NSString *)resourceSpecifier | //blog.canispater.com:80/2013/11/nsurl-reference-chart/?pg=1&other=value |
| - (NSString *)scheme | http |
| - (NSURL *)standardizedURL | http://blog.canispater.com:80/2013/11/nsurl-reference-chart/?pg=1&other=value |
Helpful? Anyone? Anyone?
Apparently, a “walk off safety” (in American football) means when the defense gets a safety (as was the case in this game in overtime), the game is over and the teams “walk off” the field. Who knew?
Yes, there’s more to this story. It isn’t the first walk off safety, but they don’t happen often. In fact, there have been only three. This one, November 2004 Bears vs Titans and November 1989 Vikings vs Rams.
I usually pride myself in finding answers to questions I don’t know the answers to by Googling. Google failed me on Halloween. Since I was watching the game delayed on the DVR, the only results I got were roughly twenty stories about the game with the keywords “walk off safety”, but no one really explaining what it meant. Maybe I was just supposed to know. I mean it seemed logical that walk off safety = game ending safety, but we all like proof and not finding it quickly became frustrating. The fact that the media was making such a big deal about it without explaining it added to the frustration. I actually heard someone say “it wasn’t just a safety, but a walk off safety. Goodnight folks. <fade to commercial>” WTF!
Of course, I’ve learned so much about walk offs in many sports now so there’s a plus side to all of this.
Well, no, you can’t legally run through a stoplight I suppose, but if a police officer flags you through, then you won’t get a ticket. The key here is that I have video proof.
My obsession with car cams or dash cams reignited with the video footage of the Russian meteor back on February 15, 2013. I was amazed that so many people had great video of the event. Then I read why. Marina Galperina posted an excellent article Why Russians Are Obsessed With Dash-Cams, but to summarize, snow and ice make for slick roads and hit & runs are rampant to the point where insurance companies almost require video evidence to pay claims.
My research led me to DashCamTalk which has a comparison of available cameras, most of which are inexpensive. Unfortunately, the one that caught my eye (F500 LHD) had to be bought directly from China meaning I would become an importer! As unappealing as that sounds, small electronics under a certain amount are not flagged by U.S. Customs so regular post office delivery worked fine. It just took a couple of weeks.
The camera is slightly smaller than a pack of cigarettes and very light so it will fit just about anywhere in your vehicle. I did have a quality problem with the suction cup mount that came with it. The suction cup separated from the mount the first time I attached it to my windshield. Fortunately, Amazon sells a replacement that is much sturdier for around $6 so I ate it and didn’t mess with a warranty replacement hassle. Also, the camera does not include an SD card (the recording medium) so I bought a 32GB card along with the new mount.
Hiccups aside, I’m very happy with the camera. It takes great HD video and the files are stored as MOV files so they import directly into iMovie. I’m also happy to report that my video has been uneventful so far.
An example of the night vision capability shows some grain, but the video is still quite acceptable.
If you want to see some dashcams in action, videos are uploaded daily to a LiveJournal blog. I also found that searching for “car crash compilations” on YouTube has most if not all of these stitched together. While some view this purely as entertainment, I can definitely say that my defensive driving mindset has increased after watching a few of these. My only problem now is that I don’t understand Russian so there may be a Rosetta Stone purchase in my near future!
I made a blog move to WordPress from SquareSpace because the price was right (included free with my domain purchase through 1&1 Web Hosting ) plus a couple of posts got away prematurely due to the quirky web interface. Don’t get me wrong, SquareSpace is a great platform for quick setup and ease of use, but I wanted a little more control over the platform and like I said, the price was hard to beat.
WordPress’ web-based editor works well for creating simple text or media rich posts. You upload media to your “media library,” then add it to your post. It’s really handy if you need to upload a lot of media. I was also pleasantly surprised with the WordPress iPad app. You have full site management capability and the post editor gives you access to the raw HTML if you want to make changes. Oh, and for you developers out there, it’s open-source!
While a WordPress blog will require more up-front configuration, there are thousands of plug-ins available for adding the functionality you need. I do recommend getting the JetPack plugin though it requires a login at WordPress.com for web stats. JetPack includes a basket of features most blogs will use.
You can get WordPress running in one of three ways:
SquareSpace has an export to WordPress function which worked flawlessly except for a few images (it got most, but not all). I copied the missing images over manually.
Setup was easy with the 1&1 admin panel. I used the Click & Build website feature to create the WordPress instance. A subdomain is required to host the software (eg: blog.canispater.com). After a couple of minutes, I received an email saying my blog was ready so I configured it like I wanted (user accounts, theme, plugins, extra pages, etc.) then chose import from the tools menu. The entire process took seconds, but I didn’t have a lot of content to move.
Once I was happy with the new blog, I repointed the domain destination to the new blog. This change propagated within a couple of minutes.
Setting up the WordPress instance was a little tricky for me because my domain was not registered at 1&1. I had to first set up an external DNS for the domain which basically means using the 1&1 DNS servers for the domain instead of the existing domain registrars’ servers. Performing this operation caused an outage while the DNS changes propagated, but everything converted over within a few minutes. Once everything worked on the new DNS, I proceeded with the install. If possible, have the domain registered with your provider to make things easier.
I had two issues to solve once everything settled. First, the RSS feed URL for the old blog was canispater.com
Redirect 301 /blog https://blog.canispater.com/feed/
Redirect 301 / https://blog.canispater.com/
The first line allows the spiders to find the new feed and the second redirects any request to the root of the domain to the blog. Note: once the spiders crawled again, all of my previous entries (previously published and imported from the old blog) were sent to the feed again.
The domain redirect worked fine with Chrome and FireFox, but not Safari (initially). Safari caches 301s and I had tried this earlier while the DNS was propagating so it cached the redirect to the generic “domain just set up” page. Clearing the browser cache solved that problem.
This was basically a weekend exercise because I had to do a lot of reading to understand the new environment. I really like what I’ve seen with the platform so far and recommend it if you want more control over your blog.