Category Archives: Pixels

P10 Panel Enclosure Build

This is how I built my P10 Panel Enclosure for my DIY North Pole sign.

The enclosure started out with a 1″ x 6″ x 8′ White PVC Trimplank from Home Depot. I used a 10″ x 84-Tooth Laminate/Non-Ferrous Metal Cutting Saw Blade to make the cuts. They are expensive, but I already had one for cutting acrylic sheets and it cuts through it like butter. The miter cuts were tricky to line up and I probably could have done a better job with that. The blade cuts a 1/8″ slot which I used to hold the clear acrylic securely.

I drilled 1/8″ holes in the bottom plate every 4″ on both sides to let moisture drain if needed.  Eyelets through the top are sealed with silicone to prevent moisture from coming through the top.

The electronics  (power supply, BeagleBone Black & a SanDevices E6804 pixel controller sit on a tray I made from 1/4″ PVC facia board (don’t have a link for that). It makes mounting the electronics easier and raises them up a little in case moisture gets inside the enclosure.

P10 Panel Setup

In this episode, we go through setting up the Beagle Bone Black with an Octoscroller and connect 4 panels in various configurations. I also go through the xLights and FPP settings.

The general steps to setting up these panels are:

  1. Install Falcon Player onto the BeagleBone Black
  2. Install the Octoscroller
  3. Connect your panels to the Octoscroller
  4. Power everything up
  5. Configure Falcon Player for your setUp
  6. Test your panels

The video walks through each step and demonstrates a working configuration.

P10 RGB Matrix Kit Unboxing

I got a P10 LED Matrix Panel Kit to make a “Tune To” sign for the display. This video starts as an unboxing video and then…

I bought this P10 panel kit from DIY LED Express. It came with:

  • 4x16x32 panels
  • 1x BeagleBone Black
  • 1x 16GB micro SD car & adapter
  • 1x octoscroller
  • 1x 5V power supply
  • 4x ribbon cables
  • 4x mounting brackets
  • 2x panel power pigtails
  • 1x power wire
  • assorted hardware

I ran into trouble while making the video so I had to cut this one short so I could do some research on the issue. I got everything working in a 2×2 configuration with the panel oriented horizontally, but was having trouble when I turned the panels vertically. I’ll do more research and report back next week.

Injecting Power For RGB Pixels

You will probably need to inject power at some point. It’s a simple technique, but not always easy to accomplish. This video shows how to inject power and when you will need to do it.

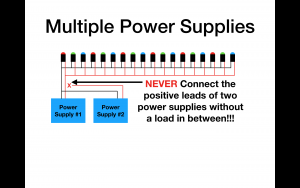
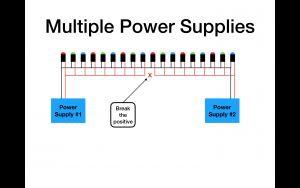
If you need to use more than one power supply, connect the negatives together and break the positive. This is the safest way to do it. I have heard that a load (x number of pixels) between the two supplies is enough to keep them from burning each other out, but since I have no knowledge of your electronics knowledge and for legal reasons, I’m saying break the positives.


IT IS NEVER ACCEPTABLE TO CONNECT 2 POWER SUPPLIES THIS WAY.